

This is the 'Shelly' Design from Artcadia.co.uk.
I mean look. Just look at that.That gorgeous, thick, textured card stock, and the way everything is pressed into it, not just printed on it, giving this extra depth to the card. I cannot express to you how much I would have loved, LOVED, to have had beautiful letterpress invitations.
But we just couldn't justify the expense. Not with the knowledge that at best they would sit on someone's mantlepiece or fridge until the wedding, and then go straight into the bin. That's if they even made it to the mantlepiece, since I was recently told of someone's friend who had to fish the crumpled and battered invitation out from the bottom of their rucksack when questioned on what the date was, to the horror of the unfortunate bride who had lovingly commissioned them, getting a cartoon of herself and her groom done especially, and hand tied with lace and string.
So, for both budgetary and pragmatic reasons, it was decided that making our own invitations would be the best way forwards.
I'd like to say we carefully planned what we would need and then sourced the most budget-friendly but high-quality materials, but actually what happened was that we got a bit overexcited in Hobbycraft and the Works Christmas sales, and then had to work out how to make the stuff we'd bought fit into a sensible design.

We got the stamp at Hobbycraft, the craft leaves from The Works, and the gold ink and the cards from Amazon. Since we're having an Autumn wedding, gold and leaves seemed like a good way to go.


The tricky thing about the stamp was not smudging the ink as you stamped, particularly with the initial batch of cards, as the stamp was coming away more heavily coated in ink. I blotted as best as I could but they still took a bit of time to dry!


Once they were dried (I didn't do this with the initial batch, but did with later ones), I hairsprayed them, to hold the ink in place and try and prevent smudging. I just used my standard hairspray. It wasn't a perfect solution, but it meant that they didn't smudge all over the envelopes when I was putting the whole lot together. I think it would have stuck better had I not used a shimmery ink, as the shimmer came off when you rubbed your thumb over it, and that maybe contributed to a few smudges. Also perhaps the use of a more textured card stock might have helped grip the ink, although at the same time it might have made the smudging worse. You never know!
Next: Applying the leaves.
For this task, after contemplating with a dubious eye a sad-looking Pritt Stick, I remembered that I had, several years ago, bought a tiny glue gun and glue sticks in the vain hope that I might eventually start making my own cosplays and props (hahah yeah that didn't happen).


Every girl needs a tiny hot pink glue gun in her accessories case!
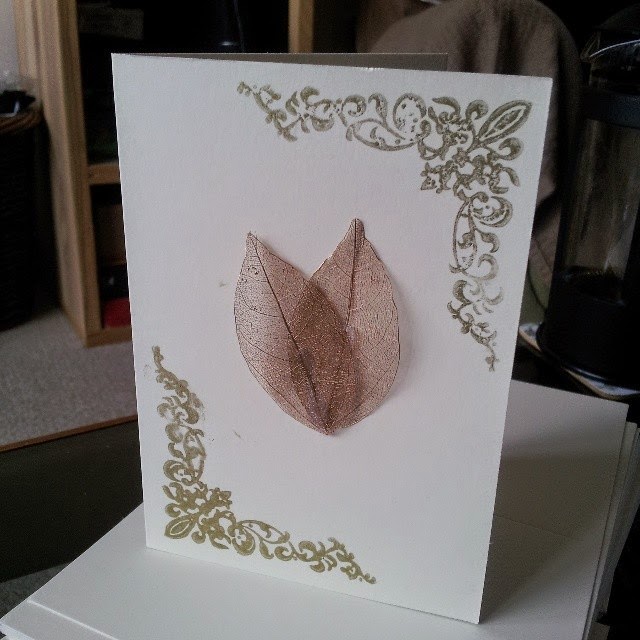
Ta-daa! The leaves glued carefully in place, not without learning that hot glue burns when you poke it (this is educational as well as entertaining, kids).

I ended up needing to make about 47 or so, but I did extras to compensate for smudging which had happened to some of them. Also spares to send off for alternative reasons, which I shall reveal later in the post!
The next step was to design the inserts - I ordered some lovely A6 postcards from PaperBox on Amazon, with a lovely texture to them. I designed the inserts in photoshop, using some free fonts gathered from pinterest and dafont.com, and then it was a case of some more glue gunning!

After that construction, it was a case of addressing the envelopes - which I had become a little nervous about since my post on the matter - however I realised that I could lightly pencil out the calligraphy first and then ink over the top. This actually worked as extra practice too, as I was making the shapes of the letters with the pencil, so my hand started to get used to the movements needed to achieve the desired effect.


I got these addresses from various blogs around the internet, which related that you could get a letter of congratulations from the Queen (only if you're British, I'm afraid), the President (possibly only if you're American, but no-one specified as most of the website are American) and the Pope. Plus it meant that I could show off my natty calligraphy without giving away the addresses of any of my friends and family.
To finish off, I made liberal use of some sealing wax I had kicking around the house, and the seal which came with the calligraphy kit.

Guys: Fiery wax also burns if you get it on your fingers. Just FYI.
And ta-daaa! That's it, my wedding invitations. Now just to wait for the RSVPs.
We got the stamp at Hobbycraft, the craft leaves from The Works, and the gold ink and the cards from Amazon. Since we're having an Autumn wedding, gold and leaves seemed like a good way to go.
The tricky thing about the stamp was not smudging the ink as you stamped, particularly with the initial batch of cards, as the stamp was coming away more heavily coated in ink. I blotted as best as I could but they still took a bit of time to dry!
Once they were dried (I didn't do this with the initial batch, but did with later ones), I hairsprayed them, to hold the ink in place and try and prevent smudging. I just used my standard hairspray. It wasn't a perfect solution, but it meant that they didn't smudge all over the envelopes when I was putting the whole lot together. I think it would have stuck better had I not used a shimmery ink, as the shimmer came off when you rubbed your thumb over it, and that maybe contributed to a few smudges. Also perhaps the use of a more textured card stock might have helped grip the ink, although at the same time it might have made the smudging worse. You never know!
Next: Applying the leaves.
For this task, after contemplating with a dubious eye a sad-looking Pritt Stick, I remembered that I had, several years ago, bought a tiny glue gun and glue sticks in the vain hope that I might eventually start making my own cosplays and props (hahah yeah that didn't happen).
Every girl needs a tiny hot pink glue gun in her accessories case!
Ta-daa! The leaves glued carefully in place, not without learning that hot glue burns when you poke it (this is educational as well as entertaining, kids).
I ended up needing to make about 47 or so, but I did extras to compensate for smudging which had happened to some of them. Also spares to send off for alternative reasons, which I shall reveal later in the post!
The next step was to design the inserts - I ordered some lovely A6 postcards from PaperBox on Amazon, with a lovely texture to them. I designed the inserts in photoshop, using some free fonts gathered from pinterest and dafont.com, and then it was a case of some more glue gunning!
After that construction, it was a case of addressing the envelopes - which I had become a little nervous about since my post on the matter - however I realised that I could lightly pencil out the calligraphy first and then ink over the top. This actually worked as extra practice too, as I was making the shapes of the letters with the pencil, so my hand started to get used to the movements needed to achieve the desired effect.
I got these addresses from various blogs around the internet, which related that you could get a letter of congratulations from the Queen (only if you're British, I'm afraid), the President (possibly only if you're American, but no-one specified as most of the website are American) and the Pope. Plus it meant that I could show off my natty calligraphy without giving away the addresses of any of my friends and family.
To finish off, I made liberal use of some sealing wax I had kicking around the house, and the seal which came with the calligraphy kit.
Guys: Fiery wax also burns if you get it on your fingers. Just FYI.
And ta-daaa! That's it, my wedding invitations. Now just to wait for the RSVPs.
They're great, you guys did a lovely job. :)
ReplyDelete